Monday, October 28, 2013

Lash Out!

Let’s talk lashes. Every girl wants long, fluttery lashes. #DUH!


So, what’s up with your lashes? Whatever you think of them now, after a few of these tricks, they are gonna be rad, promise.

Mascara, yeah no doi! But seriously, how you apply it is so crucial. First, lets talk about thickness. Of course we want thick! But not clumpy. Here’s the deal, make the base of the lashes thicker but keep the ends of your lashes soft and separated. Before you even get the mascara out, find a firm but soft synthetic brush. Get a Grips’ Eyeliner Brush is actually the perfect choice. Put a small bit of mascara on the tip of the brush and gently pat it into the base of your lashes. Careful not get it on your eyelid but as close to it as humanly possible. Then and only then do you whip out that mascara wand. Using it like a pencil, drag mascara from the edge of what you just applied out toward the ends. Wipe away excess mascara of the wand. Take your almost dry wand and swipe through to the lash ends. Look in the mirror and admire how large and fierce your eyes look. Yet, so feathery and soft.

One of our faves... MAC's Zoom Lash
Falcies.  There’s strip, and individuals to consider. If you want to add some glam, this is for sure the way to go! To add fullness across your entire eye, we recommend a strip. You can pick anything from super long and thick to very light and natural. They even come in different shades like brown and auburn. We like to use the strips with invisible bands. They are super flexible and easy to apply.  You need, an adjustable mirror on a stand, tweezers, lash glue and a small pair of manicure scissors. Once you get the lash out of the package with the tweezers, you need to measure. Hold it up to your lash to see how much excess needs to be cut, if any. If it’s a small amount, cut from the outside edge of the lash. If it’s a lot, cut from the inside and outside evenly. Try to avoid cutting from the inside if you can. Apply a small amount of glue to the strip of the lash, still holding with tweezers. Let it dry long enough to get tacky. If its too wet it won’t stick and slides around. Use the tweezers in the middle of the strip to place the strip at the base of the lashes. Have the mirror set so you can hold your eyes half open to see but closed enough to place the lash. Once the lashes are on your eye perfectly, press the strip into the base of your lashes to secure them. Hold your eyes half closed to let it dry a bit. Repeat.

Ardell's Fairies Black Lashes

As for individual lashes, use the same techniques as he strip that apply and just add the individuals where you want length. For a cat eye, put lashes on the outer corners. To open eyes up and make more round, apply to the center above your iris.
Lookin’ great Doll!

Ardell's Medium Black Individual Lashes

So, what do we do to keep our natural lashes looking amaze and feeling healthy? For one, always GENTLY remove mascara. Especially before sleep. Use a creamy or oil based makeup remover. If you are wearing waterproof, let the remover sit a few seconds before gently wiping away with cotton (not tissue) Cotton pulls at lashes and skin much less than anything else.
Use eye cream. When the skin on your eyes is moisturized so are your lashes. Keeping the dryness away prevents brittle breaking lashes. Healthy moisturized skin grows lashes better, thicker and longer.


Eat healthy! Eating healthy and balanced with plenty of good oils keeps our skin and hair beautiful! And, that includes our lashes.

Have a special Lash technique you prefer? Leave us a comment & share!!

X’s & O’s and remember to “keep it neat, FREAK!”
SOHO

Friday, October 25, 2013

We're DIYing over here

Ha, get it? Die-ing & DIYing?!

Anywaysss, Halloween is like a week away and it's time to get your inner spook-on with these amazing DIYs! So, grab your pumpkins, studs, paint & get ready for your Halloween world to be blown!

SOHO Style Studded Pumpkins

1. Studded Pumpkins
Um...whoever came up with this one deserves an award! No carving & totally freaky chic? Yes, please!

Your Studded Pumpkin Supplies

What you'll need:
  • Pumpkin - whatever size, color & shape that's going to float your boat! We grabbed a Pie Pumpkin & mini Pumpkins from Target
  • Paint - we wanted to keep it chic with black & white (hello, French Twist pumpkin inspo!)
  • Studs - channel your inner punk girl & get spikes, stars or the OG studs. We grabbed one of everything!
  • Paint Brushes
Paint your pumpkins first
Make sure your pumpkin dries completely before you stud!
1. Paint your pumpkin
Get creative - paint it all one color or make it funky fresh with stripes like we did! After you've put your first coat on, wait for it to dry & go back for any touchups you might need. Be sure the paint is all dry before studding though!

These grommet studs work the best! If you get any other studs, grab some glue so they'll stick!
Stud your pumpkins however you want! Mix up the patterns, studs & colors for a cool look
2. Get your stud on
Once the paint has dried & you've taken care of any touch ups, grab your studs! Put them in a shape, pattern or randomly dot your pumpkin with studs! We did a little bit of everything!

Go crazy with your paints & studs!
3. Whoa that's a chic pumpkin!
Um, that's what all your friends are going to be saying when your pumpkins are done! Throw em on your porch, use them as a centerpiece or keep em at your desk for a festive vibe. We love using the small pumpkin as a paper weight or a book end!

Candy Corn inspired Clean Up Your Act Brush Cube
2. Candy Corn Brush Cubes
We stumbled upon this Candy Corn Jar DIY using mason jars on Pinterest (um, yes...we are pinaholics) but took it to a whole 'nother SOHO level by getting our Clean Up Your Act Brush Cubes involved. Creative...we know!

Your  Candy Corn Brush Cube Supplies...
What You'll Need:
1. Measure & cut 3 pieces of tape to wrap around the brush cube - ours were 10.4". You could totally paint directly on your cubes if you'd like but we're going for a temp festive look instead of a permanent one :)

Paint each piece of tape 
Let those pieces completely dry before you touch them!
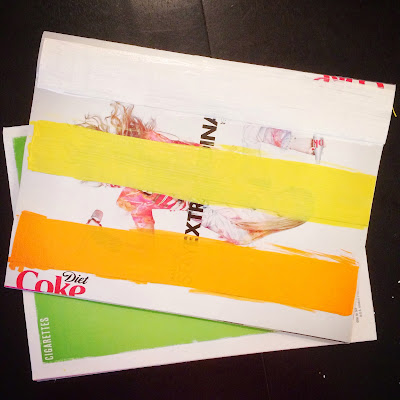
2. Paint each piece of tape - 1 white, 1 yellow & 1 orange & let them dry. We found that putting the tape on a magazine to paint was easiest but you can paint on any service you'd like!
Wrap & smooth the tape around the cube. If you need to touch up, no worries - you can do that once the tape is on the cube :)
3. Wrap your dried pieces of tape around your cube to get the candy corn look! 

We ate candy corn while we made ours...
That was way too easy...like what? 

Still wanting to do more? We found this super cute Cat Ear DIY that we're totally wanting to wear with our Claws & Effect Envelope Clutch for a cool kitty cat look on Halloween! 

Alright freaks, get your DIY on and let us know how it goes!

X’s & O’s and remember to “keep it neat, FREAK!”
SOHO

Wednesday, October 23, 2013

Girls Night In

What’s a stressed, tired and cranky girl to do? Plan a party! When life gets completely overwhelming and we just need some me and my girl’s time, that’s when it is time to chillax. And SOHO Beauty is your party planner to the rescue!


Get a couple of friends together to pamper and pretty your way to bliss. Start out with setting the mood. Pick a spot in your place that is peaceful and close to the kitchen or bathroom. Get your spa on with scented candles and semi dim lighting. Play some chill tunes. We like to set out a few yoga mats for stretching and relaxing in between treatments. (Ohhhhmmmmmmm)


Treat yourselves to delicious snacks. No girl, put the Cheeto’s away. We want to feel healthy and pretty on the inside as well. Serve chilled water with cucumber and raspberries. Cucumber is an UBER hydrator while raspberries are a super food that keeps us lookin’ young. Guac and kale chips for healthy and glowing skin. You get the idea…

So, what’s the beauty 411 you ask? Here’s a beauty breakdown for optimum babeness.

Start out with a good scrub down. Sugar scrubs gently brush off dry flaky skin for sure. But, they also help with circulation by bringing blood to the surface which keeps skin cells plump and healthy. Thas some mega glow.  Wanna DIY it? Mix brown or white sugar into some grape seed or olive oil. Add a soft scent like lavender oil or vanilla. Pre mix it and have small bowls ready for the girls when they arrive. Ultra chic touch? A few lavender flower petals floating at the top. Tip: Have your guests bring large beach towels and bathrobes to KEEP IT NEAT.


Warm milk is so cozy. Especially when our toes are soaking in it. Fill foot baths or large tubs with warm whole milk scented with almond extract. The lactic acid softens rough heals and skin. Do quick pedis before you soak for ultimate results.


Have several facial masks available so each girl can customize to her unique needs. Even cooler? Set up a “Facial Bar” Fill a table with ingredients and small bowls. Now you can all make your own awesome mix. Small cards describing each ingredient will give hints for the perfect mix.  Our fave ingredients for a facial bar are oats for gentle exfoliation and moisture. Yogurt for oily, break-out prone skin.  Lemon juice for evening out skin tone and combating fine lines.  Tip: Lemon juice also zaps dandruff. Rub it on the scalp before adding a hair mask.


Have plastic wrap and hair dryers close by. Apply a favorite hair conditioner or hair mask. Wrap each others’ heads in plastic wrap. Heat with a hair dryer for a deep deep condition. Gorgeous locks to follow.


When everyone looks and feels silky and smooth, relax with a fave chick flik, a cozy fire and some wine. Heaven.

X’s & O’s and remember to “keep it neat, FREAK!”
SOHO

Monday, October 21, 2013

DIY Dabble: SOHO Style

SOHO Clean Up Your Act Cube in Neon Coral // Avail at Walgreens

Hi we're SOHO Beauty, and we're Pin-a-holics!

We're always perusing Pinterest for fashion, beauty & travel ideas but we've been getting kind of obsessed with DIY projects lately! We love pimpin' our pads & came up with a cool way to make your SOHO 'Clean Up Your Act' organizers pinterest-worthy.

We're showing you how to take your beauty organizers up a notch with this fun chalk sticker DIY.

What You'll Need:
1. Chalk Labels
2. Chalk (keep it classic with white or get crazy with some bright, fun colors!)
3. Any SOHO 'Clean Up Your Act' Beauty Organizer. We think our Cubes, Cups, and Swab & Stuff Oragnizers work the best!

SOHO Clean Up Your Act Duo Brush Cylinder // Avail at Walmart
Step 1: Chose the label you'll want to use - make sure it fits the cube, cup or organizer you're DIYing!
Step 2: Write your use on the label - brushes, Q Tips, Cotton Balls, etc. Get creative with it - living in the dorm? Throw your utensils in there to Keep It NEAT!
Step 3: Stick the label to your cube, cup or organizer
Step 4: Take a step back and admire your work. Um, how cute does that look?!

SOHO Clean Up Your Act Brush Cube in Blue/Purple Ombre // Avail at Walgreens
SOHO Clean Up Your Act Duo Brush Cylinder in Neon Coral // Avail at Walmart
What do y'all think?!

X’s & O’s and remember to “keep it neat, FREAK!”
SOHO

Monday, October 14, 2013

Dopest Halloween Looks for 2013

We have been thinking Halloween for weeks now and cant wait to try out the most legit amazing looks going on right now. Yeah, Zombies, Vampires and the occasional banana but that’s NOT where we are headed. We want to stand out and look hot while we are at it!

Top Three Scene Stealer Sexy (not nurse) Costumes

 1.Pop Art Comic Girls. Lichtenstein was a way prolific pop artist of the 60’s and his must have prints are everywhere right now. How cool is it to become 2d and bring this artist’s work to life? Um, very cool. Lictenstein LOVED blondes (but don’t we all?) So, don’t forget to either pick out a 60s era blonde wig or, even better…mold the hair you have with heavy hold styling gel and pick up some yellow spray hair paint. Don’t hold back on those brows either, its all about that heavy black dramatic brow to give you that comic book expression. Keep your face dots small and close together. Otherwise, you just look like you got a bad case of the measles…This is a super cool makeup look that is easy to replicate but looks like a hard core pro did it.


2. Sugar Skulls. How to look mysteriously beautiful and spooky all at once? Sugar Skulls. Be as elaborate or simple as you fancy. We cant get enough of spider webs and flowers combined. Brush on designs with crème eyeliner. To keep your skin looking beautiful, mix your own foundation with white face paint. This keeps the texture smooth and gives you a more realistic flattering white. And girl, don’t be afraid to get that hair big either. Add in extensions and tease into an elaborate updo. Don’t worry about it being perfect, it should be a bit messy.


3. Pin Up. This is your chance to be the bombshell of the room. Who wouldn’t want to be glammed up when everyone else spent their night trying to figure out how much toilet paper to stick on their face is too much. Let the guys worry about that Zombie stuff. We want to look like Marylin Monroe, please. Must haves? Red and deep wine toned lips shaped full and pouty. Add a strategic mole like, below one eye or around the mouth. Eye shadow should be light with a bit of contouring in the crease. Lashes MUST be full. Add two demure sets instead of one large pair so they are full and fluttery. Set your hair in old school rollers earlier in the day for authenticity. Lots of hairspray, that style should not move. And if you want, throw on that nurse costume! Vavavoom….


Need some extra know how? YouTube baby, we know you are already typing it in!

X’s & O’s and remember to “keep it neat, FREAK!”
SOHO

Friday, October 11, 2013

French Twist Inspiration - Get your STUD on!


Beauty babes, you know us, we're totally inspired by what's hitting the runway and the latest streestyle trends to give you the most FUNKtional beauty bags ever! Well, this month we're all about the spiked tweed.

Um, what's not to love? You've got the girlyness of the tweed & the edginess of the studs - throw 'em together and you've got some pretty sweet accessories...at least we like to think so! From haute couture designers like Chanel all the way to some of our favorite retailers like Nasty Gal, this trend has made an impression and is totally here to stay this Fall! Ya dig?

Check out our exclusive collection below and scoop your bags up while you can only at Target! Yes, these haute mamas are selling like hot cakes!


French Twist Jewelry Organizer
Jewelry Organizer Interior


French Twist Cosmetic Box


Cosmetic Box Interior

French Twist Valet


Valet Interior

French Twist Weekender
Weekender Interior


Thursday, October 10, 2013

Nailed It! Half Moon Nail Tutorial


We just discovered how to do one of the coolest nail art designs. We have been eyeing those two tone half moon nails all over Insta. It’s so simple we were like “what?”

You are gonna need about 30 minutes including dry time.
2 polish colors, preferably a light or pastel color and one medium to dark color. Choosing is gonna be OH SO FUN! We love color combos like white and yellow or mint green and turquoise. Pastel pink and Kelly green, the list goes on and on… We chose coral, a brown-grey, and metallic blue-grey.

Secret weapon? Get to your nearest office supply store and grab those dime sized circle shaped sticker labels. That’s right, its that easy!

Once your nails are prepped to your liking and ready to polish, apply your first coat of the lighter color. If you are super light handed, go ahead and do two coats.
WAIT WAIT WAIT. Make sure you have waited until your nails are completely dry.

Get your sticker labels out. Stick one label at the base of each nail creating a half moon shape.
Take your darker polish and do 2 coats. Again, wait until your nails are completely dry.
Be super gentle and carefully remove each sticker.

VIOLA! You now have the bangin’ est nails. What a pro!
Show us your color combos.

X’s & O’s and remember to “keep it neat, FREAK!”
SOHO